 席天卷地个人博客
http://www.msexchange.org/articles-tutorials/exchange-server-2007/migration-deployment/moving-mdaemon-exchange-server-2003-2007-part2.html
Introduction
In the last part of this article series we saw how to export and import accounts and passwords from MDaemon to an Active Directory/Exchange Server environment when required. Let us hold on the directory authentication and Global Address list migration for a bit and let us focus on the mail routing portion of the migration in this article.
The first step is to make sure that Exchange Server 2007 will be able to receive, send and route messages back and forth to the internet, MDaemon Server and local mailboxes. In order to accomplish this task we need to configure Receive Connectors, Send Connectors and other exchange components in the current organization. The current scenario has all mail traffic using the current MDaemon server (Figure 1). In this article we are going to configure Exchange to handle the current SMTP traffic and also communicate with MDaemon Server.
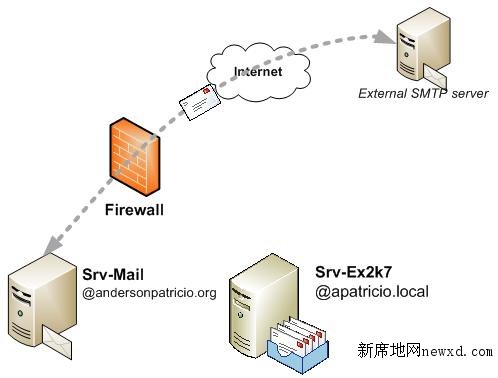 Figure 1
Configuring Accepted Domains and E-mail Policies …
By default, any new Exchange Server 2007 installation has a single default domain and it is the FQDN (Full Qualified Domain Name) of the current Active Directory. In our scenario, the Active Directory FQDN name is apatricio.local, which means that our Exchange accepts only messages addressed to users containing domain@apatricio.local.
The first step is to configure Exchange Server organization to accept the domain that is being used by MDaemon and also configure it as a shared SMTP Address. The following steps may be followed in order to configure a shared accepted Domain.
- Open the Exchange Management Console
- Expand Organization Configuration
- Click on Hub Transport
- Click on Accepted Domains tab.
- In the toolbox actions, click on New Accepted Domain and type in a label for the new domain name in theName text box.
- Fill out the domain that will appear in our Exchange organization accepting messages.
- Select the option Internal Relay Domain radio button (Figure 2).
- Click on New and Finish in the following screen.
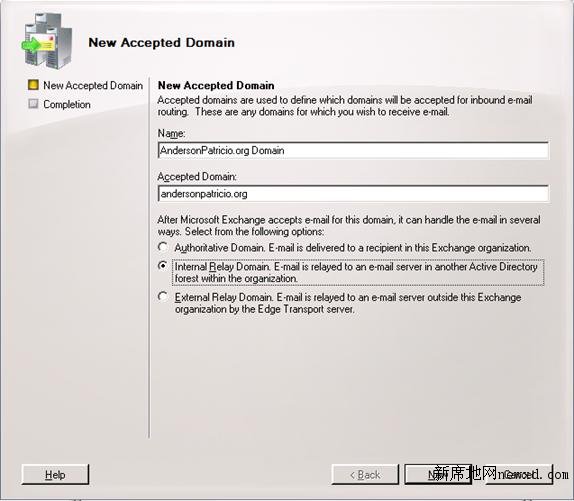
Figure 2
When we have the Internal Relay Domain option selected for an Accepted Domain, that domain is not authoritative, which means that exchange will accept relay for the domain. However, the user may not exist in the Exchange Organization. Exchange will check if there are any messages addressed to that domain against the current users’ proxy address. If it does not find the SMTP address, the message can be routed to another host through a Send Connector. If we leave the default setting (Authoritative domain), then, any message sent to Exchange that does not contain an SMTP associated to an AD user will be refused and a NDR will be generated saying that the mail address does not exist.
Now that we already have the Accepted Domain, it is time to configure the shared SMTP address to be stamped in all new and existent users, as follows:
- Open Exchange Management Console
- Expand Organization Configuration
- Click on Hub Transport item
- Click on E-mail Address Policies tab
- Double click on Default Policy
- In the first wizard page click on Next twice.
- In the E-mail address page, click on Add button and then SMTP Address
In this last window, we are to configure the SMTP Address policy that will be applied to all new users. This section is really important from a coexistence perspective because all migrated users will be created on Exchange server and they will receive the current SMTP policy. If the current SMTP policy matches the current SMTP addresses that have been used in MDaemon we will not have any extra work to configure SMTP address after migration. After configuring the SMTP policy, click OK. (Figure 3).
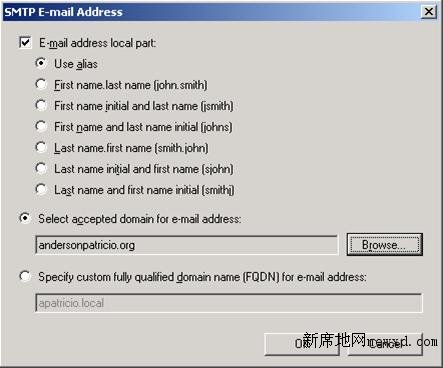
Figure 3
All SMTP addresses that will be assigned to the users that belong to this policy will be displayed, as shown in Figure 4. In our current deployment, all users in our exchange organization will receive two SMTP Addresses: @andersonpatricio.org and @apatricio.local. It is very import to keep at least two different addresses at this point because we are going to use the second one that is not being used by MDaemon to route internal messages from MDaemon. Click on Next twice, and click on Edit using default settings to apply the new policy to the existent users.
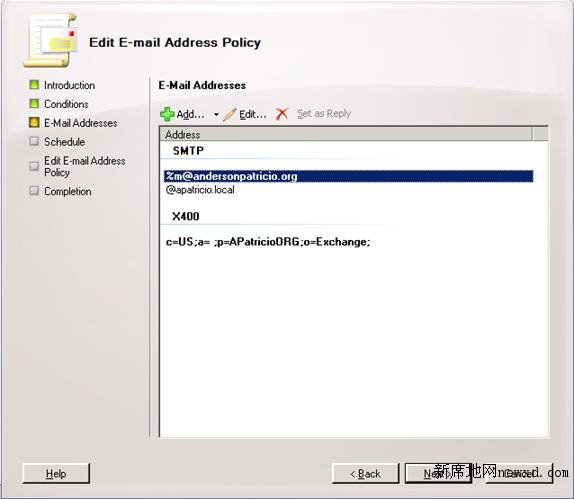
Figure 4
After applying the E-Mail Address Policy, we can double click on an existent user or create a new one and all SMTP Address configured in the default policy should be stamped in the E-mail Addresses tab of the user object properties using Exchange Management Console.
Configuring Send Connectors
Our next step is to configure Exchange server to route messages to MDaemon and Internet as well. These following steps can be used to create the SMTP routing to MDaemon:
- Open Exchange Management Console
- Expand Organization Configuration
- Click on Hub Transport item and click on Send Connectors tab
- Click on New Send Connector located in the Toolbox Actions
- Fill out a descriptive name for the connector and make sure that Internal option is selected
- Click Next. (Figure 5)
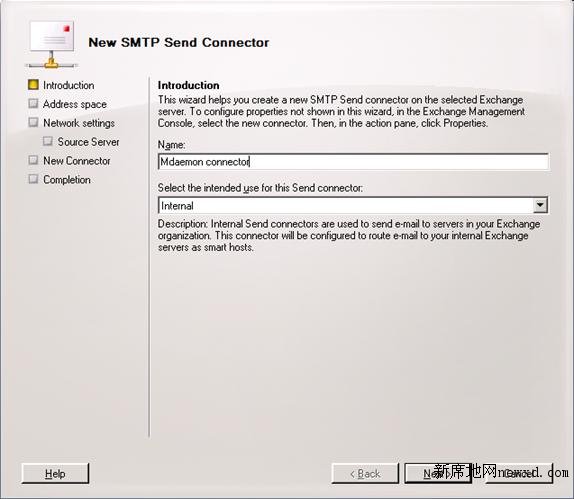
Figure 5
In the address space section, click on the Add button. In the Address field, add the domain that is being shared between two mail systems and click OK. The result is shown in Figure 6. Click Next.
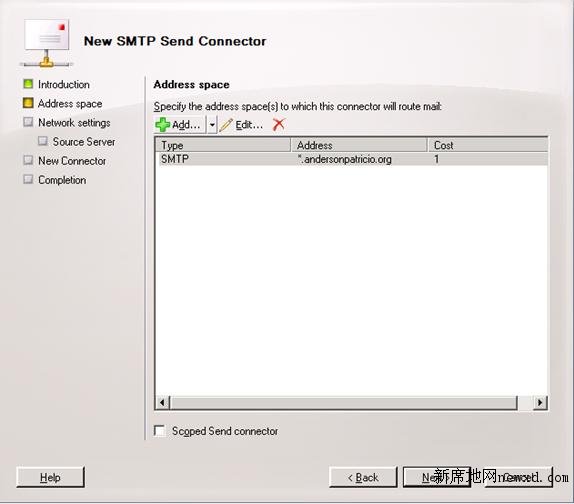
Figure 6
So far we confirmed that all messages addressed to @andersonpatricio.org are going to be routed through this connector. The next section of the wizard configures what the destination for these messages is going to be, in our case, the MDaemon server.
Note:
The message is going to be routed only if there is no local Mailbox using the mail address.
Click on the option Route mail through the following smart hosts and click on Add. Next, add the IP address of the third-party mail server and click on Next, as shown in Figure 7.
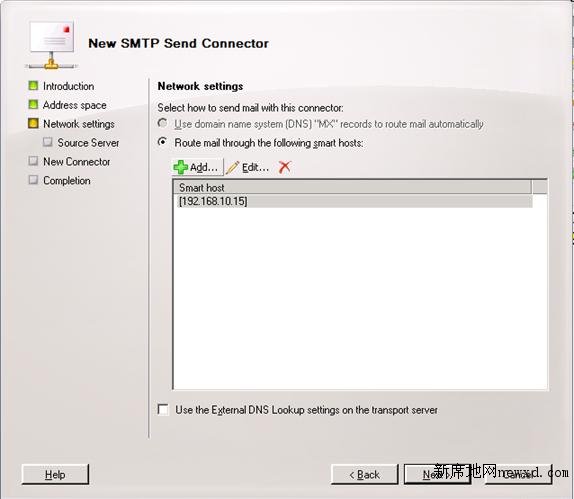
Figure 7
Because we have both servers located in the internal network, the authentication will not be used to route messages, but can be configured using several option from the authentication settings page. Let us leave the default settings which has no authentication and click Next. In the Source Server make sure that the local exchange server is listed and click Next, click New in the following page, and then Finish to conclude the process.
The second step using Send Connectors, is to configure Exchange Server to send messages to Internet since down the road we are going to configure all incoming and outbound traffic through Exchange Server. Before switching over it is extremely important to make sure that Exchange is ready to receive and send messages back and forth without any interruption in the current mail flow.
The process of creating a send connector to send messages to the internet is almost the same that we have just done, here are the summary of the required steps during the Send Connector wizard:
-
Introduction. Label this connector accordingly and select Internet.
-
Address Space. Add a SMTP address and use *in the address field
-
Network settings. Leave the default settings.
-
Source Servers. Leave the default settings.
Besides of the Send Connector component configuration on Exchange Server, there are several components that are used to send messages out, such as: reverse DNS, SPF record, FQDN configuration in the Send Connector using the proper FQDN name.
After configuring Accepted Domains, Recipient Policies and Send Connectors we can visualize the changes made in our environment so far in Figure 8.
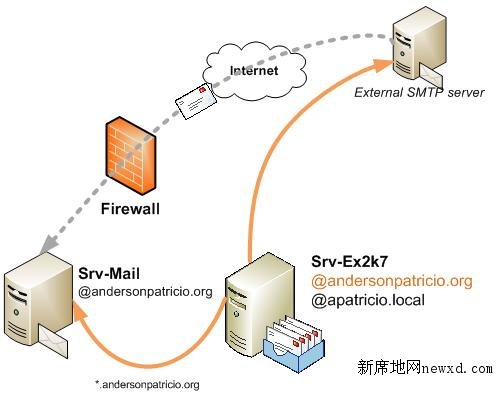
Figure 8
Conclusion
In this second article we went over the Exchange configuration to route messages to MDaemon server and also send messages to the Internet. In the next article we will continue configuring SMTP routing and we will be executing some tests to validate the SMTP routing architecture.


评论前必须登录!
注册